为macOS打造一个防污染的本地DNS

Cover: 華如桃李 - 豆の素@Pixiv
前言
家里这边DNS劫持是在是有点严重,非常影响开发速度,所以我就使用dnsmasq和dnscrypt-proxy搭建了一个防污染防劫持的本地DNS。
效果演示

搭建过程
如果网络有问题,建议先执行以下指令追加hosts
sudo sh -c 'sync && echo "199.232.4.133 raw.githubusercontent.com">>/etc/hosts'
sudo sh -c 'sync && echo "199.232.4.133 raw.github.com">>/etc/hosts'首先要安装Homebrew,这个绝大多数用macOS的人应该都安装了吧,官网https://brew.sh/,安装指令如下。
/usr/bin/ruby -e "$(curl -fsSL https://raw.githubusercontent.com/Homebrew/install/master/install)"然后就是安装dnsmasq和dnscrypt-proxy两大组件了。
brew install dnsmasq
brew install dnscrypt-proxy装好之后,编辑配置文件,首先是dnsmasq的配置,文件路径/usr/local/etc/dnsmasq.conf。
#忽略本机DNS解析结果
no-resolv
#增加配置文件夹
conf-dir=/usr/local/etc/dnsmasq.d
#设置上游服务器为dnscrypt-proxy
server=127.0.0.1#5300然后是dnscrypt-proxy的配置,文件路径/usr/local/etc/dnscrypt-proxy.toml。
#本地监听5300端口
listen_addresses = ['127.0.0.1:5300']
#防劫持DNS使用NestDNS
server_names = ['nextdns']
#设置容错DNS为114DNS
fallback_resolvers = ['114.114.114.114:53']
配置好了之后,重启两个组件的服务。
sudo brew services restart dnsmasq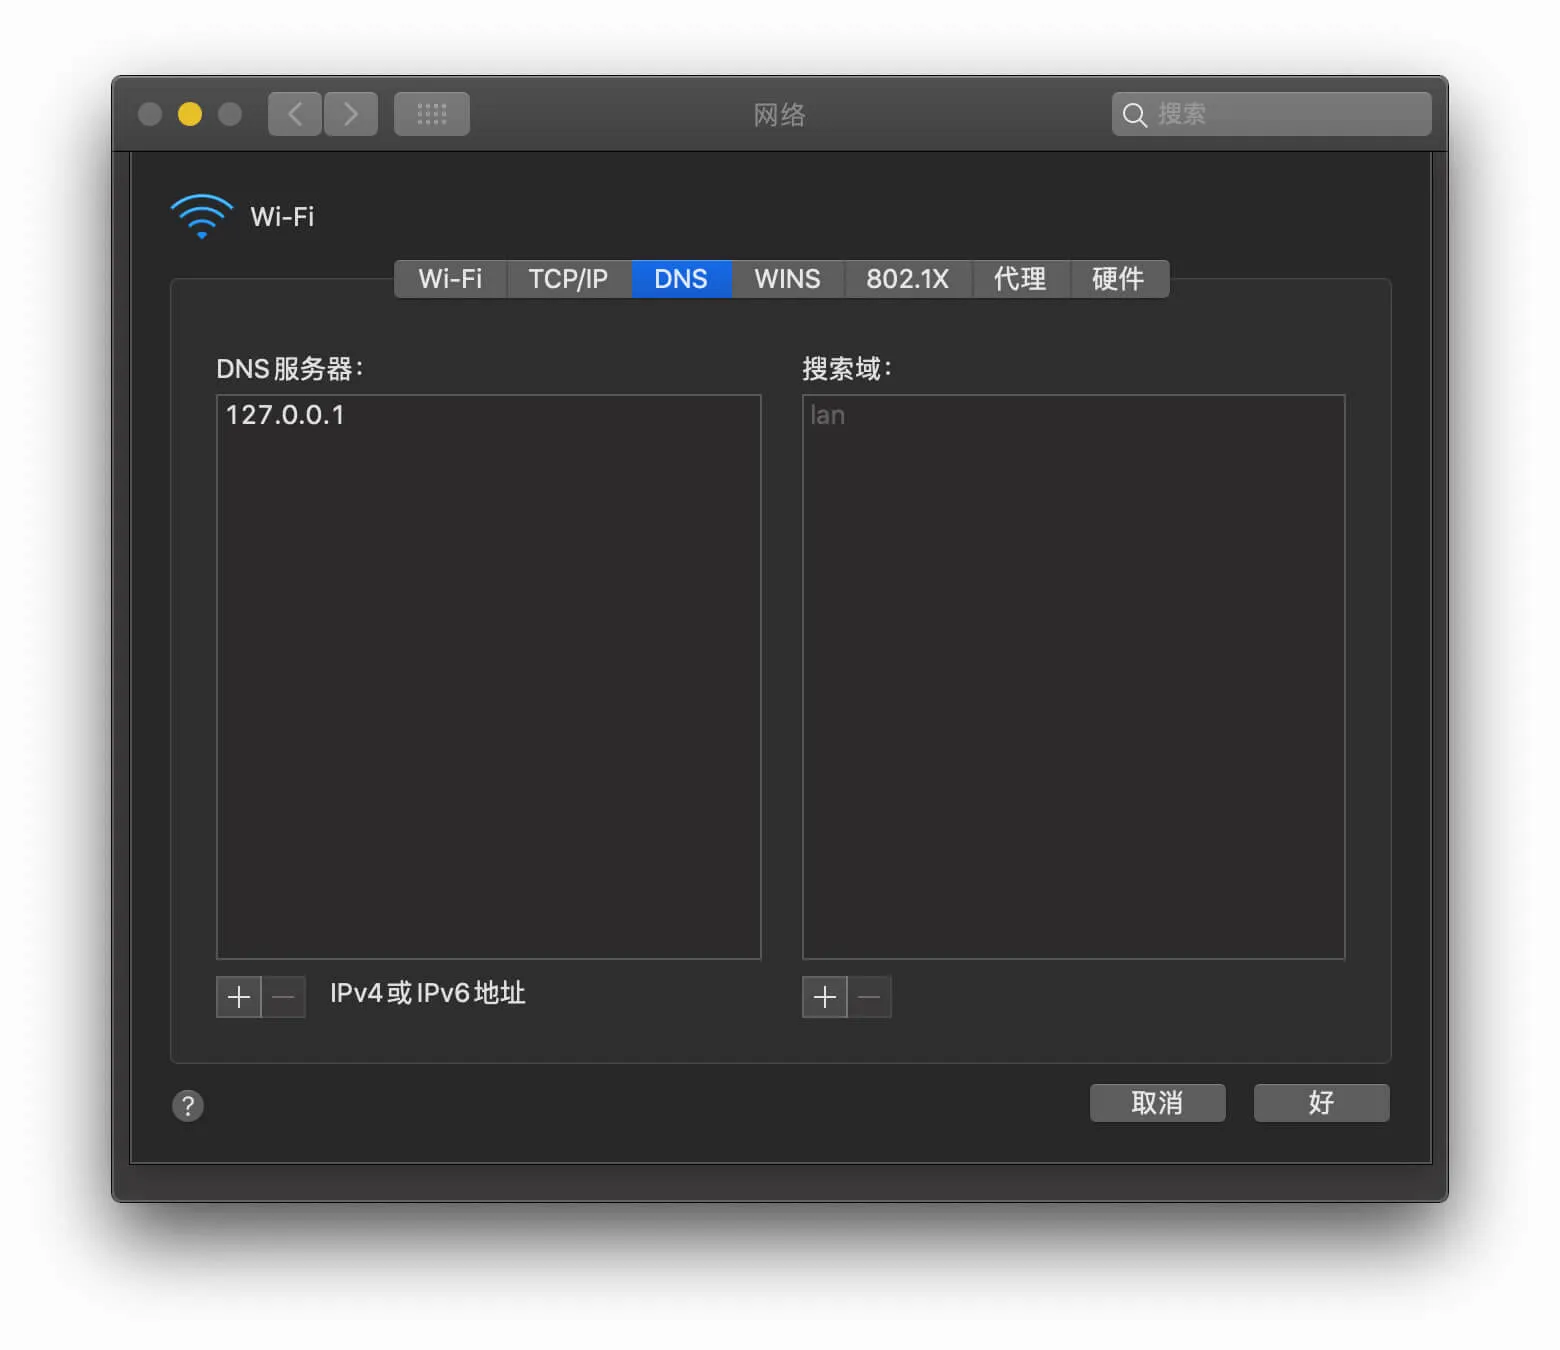
sudo brew services restart dnscrypt-proxy之后再把网络设置里的DNS地址修改为127.0.0.1,应用之后就可以享受无污染的DNS了。
执行过上面修改hosts的指令的话建议执行这个清除hosts
sudo sed -i "" "s/199.232.4.133 raw.githubusercontent.com//g" /etc/hosts
sudo sed -i "" "s/199.232.4.133 raw.github.com//g" /etc/hosts
国内白名单
虽然DNS没有了污染,但是国内网站DNS全都变慢了,这个肯定不能接受,所以我们接入dnsmasq-china-list项目,来优化本地的DNS。
mkdir /usr/local/etc/dnsmasq.d
WORKDIR="$(mktemp -d)"
curl https://raw.githubusercontent.com/felixonmars/dnsmasq-china-list/master/accelerated-domains.china.conf -o "$WORKDIR/accelerated-domains.china.conf"
curl https://raw.githubusercontent.com/felixonmars/dnsmasq-china-list/master/bogus-nxdomain.china.conf -o "$WORKDIR/bogus-nxdomain.china.conf"
curl https://raw.githubusercontent.com/felixonmars/dnsmasq-china-list/master/google.china.conf -o "$WORKDIR/google.china.conf"
curl https://raw.githubusercontent.com/felixonmars/dnsmasq-china-list/master/apple.china.conf -o "$WORKDIR/apple.china.conf"
sudo cp -f "$WORKDIR/accelerated-domains.china.conf" /usr/local/etc/dnsmasq.d/accelerated-domains.china.conf
sudo cp -f "$WORKDIR/bogus-nxdomain.china.conf" /usr/local/etc/dnsmasq.d/bogus-nxdomain.china.conf
sudo cp -f "$WORKDIR/google.china.conf" /usr/local/etc/dnsmasq.d/google.china.conf
sudo cp -f "$WORKDIR/apple.china.conf" /usr/local/etc/dnsmasq.d/apple.china.conf
rm -rf "$WORKDIR"
OK大功告成。
一键安装脚本
项目地址:https://github.com/mouyase/mac_dnscrypt_installer
脚本使用:
git clone https://github.com/mouyase/mac_dnscrypt_installer
cd mac_dnscrypt_installer
./install.sh